How to extract text from a screenshot on Mac with ClariRec: install from the Mac App Store, grant Screen Recording, press ⌥S, and select the region. Default OCR runs on-device via macOS Vision — no account, no ClariRec content servers.
This page is the how-to for capture and results. For what stays local vs cloud, see Local OCR for macOS. For an offline settings checklist, see Offline OCR and translation.
That covers the common case when text is stuck in a chat bubble, slide, UI mockup, or scanned page, and retyping or uploading to a website is too slow.
What you can extract
ClariRec is built for repeated OCR, not one-off experiments:
- Chat and messaging screenshots where copy is blocked or awkward
- Presentation slides, lecture notes, and image-heavy PDFs
- Code, logs, and error dialogs captured as images
- Product UI, diagrams, and design mockups
- Clipboard images from other apps (
⌥V) - Image files opened from Finder or dragged into the app
Default System OCR stays on-device. ClariRec does not operate servers that receive your screenshots.
First-time setup
- Install ClariRec from the Mac App Store.
- Open it from the menu bar.
- Grant Screen Recording when prompted — required only for screenshot OCR (
⌥S). ClariRec captures the region you select, not your screen continuously. - Keep the default OCR engine on System unless you intentionally configure a BYOK provider later.
No account is required. Notifications are optional (useful for Silent mode). Accessibility, Camera, Microphone, and Apple Events permissions are not required.
Core workflows
1. Screenshot OCR (⌥S)
- Press
⌥Sfrom any application. - Drag to select any screen region containing text.
- Millisecond recognition (typically under 300ms on modern Apple Silicon Macs).
- View editable text in the result window, or let HUD / Silent mode streamline your capture loop.
- Continuous mode: Take back-to-back screenshots without manually opening and closing windows.
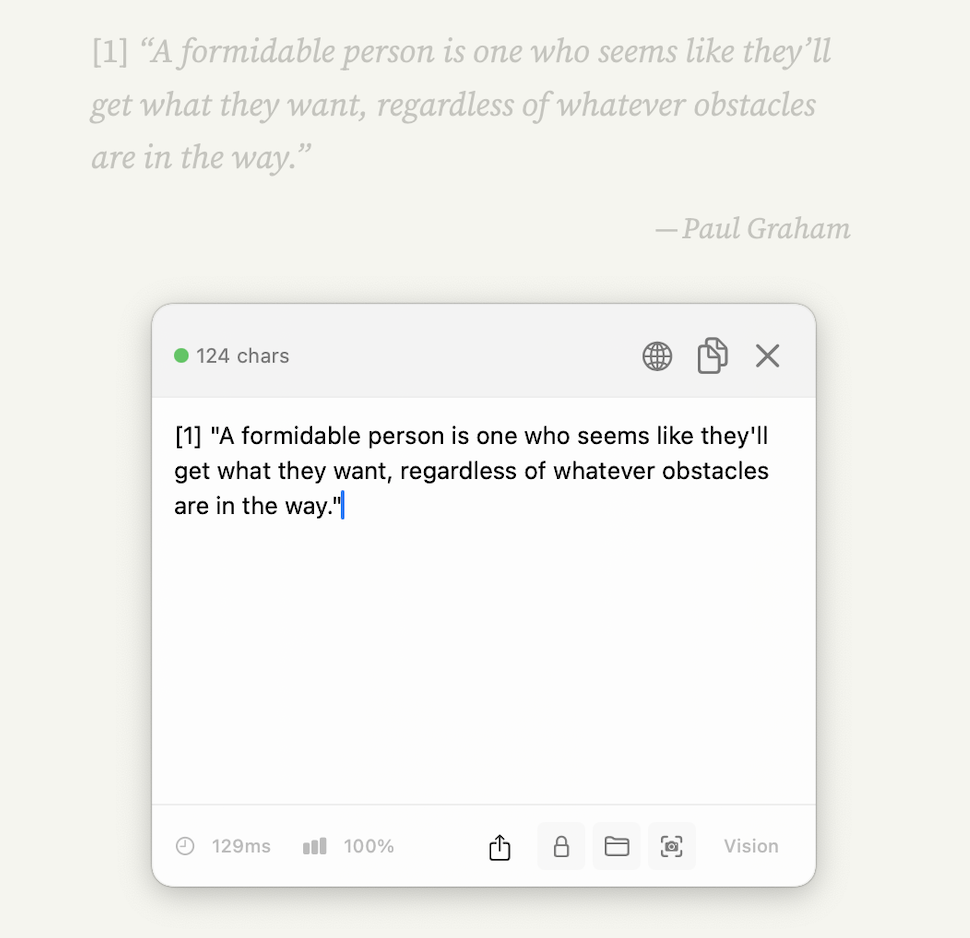
Real capture: Popup mode after ⌥S. Non-activating overlay preserves focus; recognized text is editable with timing and engine shown in the footer.
2. Clipboard image OCR (⌥V)
- Copy any image or screenshot to your clipboard (
⌘C). - Press
⌥V, and ClariRec instantly recognizes text from the clipboard image without re-selecting on screen.
3. Image file OCR
Choose “Open Image File” from the menu bar or drag-and-drop any image file directly into ClariRec.
Result display modes
| Mode | What you see | Best for |
|---|---|---|
| Popup | Floating window with source image and editable text; supports custom width (360–560 pt) and font sizes (12–20 pt) | Verifying accuracy, editing typos, side-by-side translation, file export |
| HUD | Compact pill near your cursor that auto-dismisses after ~1.5s | Quick confirmation without window clutter |
| Silent | Copies directly to clipboard with a subtle system notification | High-frequency continuous capture with zero interruption |
Window width and text size customization
- Text size: Adjust body text scale between 12 pt and 20 pt using the
Aatoolbar control or shortcuts⌘+/⌘-/⌘0to reset. - Window width: Adjust between 360 pt and 560 pt in 20 pt steps via the Display popover or in Settings → General.
Post-recognition actions
- Automatic clipboard copy: Extracted text is immediately ready to paste with
⌘V. - Smart Cleanup: Automatically repairs hyphenated line breaks and unintended split paragraphs.
- Markdown tables & lists: Detects grid structures and exports clean Markdown pipe tables; supports native list parsing on macOS 26.
- File export: Export directly to
.txtor.mdfiles. - Edit & retranslate: Edit OCR text directly in the box and press
⌘⏎(Command + Return) to retranslate instantly without recapturing. - Formula to LaTeX (20 free a month): Click the “Formula” button to extract printed math into clean LaTeX code with live on-device KaTeX preview.
When default System OCR is enough
Keep System OCR if you mainly need:
- Clear UI text, chat messages, and slides
- A fast local path with no API key
- Offline recognition after Screen Recording is granted
This is the recommended default for most Mac screenshot OCR work.
When to use BYOK OCR (Pro)
Optional third-party OCR is useful when System OCR quality is not enough for a specific image — dense scans, unusual fonts, or languages where a remote provider performs better for you.
Important boundaries:
- Provider setup and connection testing are free
- Actually running remote OCR (as the default engine, or as a one-off rerun in the result window) requires ClariRec Pro, unless the device has legacy access from an earlier remote OCR setup
- Selected images go directly to the provider or compatible endpoint you configure
- ClariRec does not proxy that content through ClariRec-operated servers
See the API key guide for provider fields, and Local OCR for macOS for the full network boundary.
Troubleshooting
Screen Recording is denied
Open System Settings → Privacy & Security → Screen Recording, enable ClariRec, then try ⌥S again. Clipboard (⌥V) and file OCR do not need this permission.
Shortcut does nothing
Check Settings → Shortcuts for conflicts with other apps. Remap ⌥S / ⌥V if needed.
Text looks wrong or broken across lines
Try a tighter selection, a clearer source image, or Popup mode so you can edit the result. Smart cleanup helps with hyphenation; it cannot invent missing characters.
You need a table in Markdown
Use Popup mode and look for the table copy action when a grid layout is detected. On macOS 26, native document recognition can improve table and list structure.
You want zero cloud involvement
Keep the OCR engine on System, and do not enable BYOK OCR, cloud translation, or formula recognition. See Local OCR for macOS.
Related
Local OCR · Translate · Markdown tables · Shortcuts · vs Live Text · TextSniper alternative · CleanShot X alternative · FAQ